SVN in the office, GIT at home. That is my current setup. How is it possible? Simple, GIT is so flexible that it can mingle with SVN very well. This is how I actually do it.
GIT at home
First, we have a running SVN central repository. To avoid conflict (although I could have done this the other way around) I exported the current project into a safe location. I bring it at home after office hours and setup a working directory out of the exported files.
cd /path/to/your/working/directory
git init
That will initialize an empty GIT repository on our project directory. Next we have to add the source codes and commit it.
git add .
git commit -m "Added project to repo."
Usually, we have some files or directories that are not needed to be under version control such as cache and log files. We will ignore them by creating a .gitignore file. Create a .gitignore file on the working directory, add and commit it afterwards. Below is a sample .gitignore file.
# Ignore Eclipse related config
.buildpath
.project
.settings

# Ignore dynamic / cache / log files
application/data/*
application/logs/*
application/tmp/*
After saving the file, add it to the repository:
git add .
git commit -m "Ignored some files."
If ever you have modified some files, you have to commit it afterwards. If you want to view a graphical representation of what has changed / modified, issue this command:
gitk
It will launch a window that shows the history of what you’ve done.
Clone repository
Now, what if we are going to bring the modified source code into the office? Easy. Grab your flash drive / thumb drive or external hard disk and clone your repository to it.
cd /path/to/your/portable/media
mkdir your-project-name
git clone /path/to/your/project_dir your-project-name
cd your-project-name
git remote rm origin
First, you change directory into your portable media directory (example: flash drive / thumb drive). Second, you create a directory for your project. Third, you clone your project into the newly created directory. Fourth, you change move inside the clone directory. Last, you removed the origin of the clone repository.
We removed the origin simple because it will always print an annoying message saying that you are ahead of xxx commit from your origin.
Combining with SVN
At the office, I will again create another repository. First, we will go to our SVN checkout directory and create a git repository there.
cd /path/to/your/svn/checkout/project
git init
You initialized your project directory which is also an SVN checkout directory. Before you add the files, we must first ignore all SVN related files. Create a .gitignore file and enter something like this:
# Ignore SVN files
.svn
Save the file and add it then commit.
git add .
git commit -m "Added project to repo. Ignoring svn files."
You should also ignore the .git and the .gitignore in your SVN so that they will not get added to SVN same as your SVN are not added to GIT. You can now work in your office SVN repo, add and commit. At the end of the day, you will commit all changes to your GIT repo on the same directory.
Now, we have 3 GIT repositories, one at home, one in the flash drive / thumb drive and one at the office. We need to synchronize the files by using the command git pull. First, plugin your flash drive / thumb drive.
Assuming that your current project directory (office repo) is at:
/var/www/htdocs/project-name
and your flash drive / thumb drive repo is at:
/media/YOURTHUMB/git-repo/project-name
then we will pull the changes from the flash drive and merge it on our office repo. This is how we will do it.
cd /var/www/htdocs/project-name
git pull /media/YOURTHUMB/git-repo/project-name
The command will fetch the changes on your thumb drive repo and merge it automatically to your office repo. If there are conflicts, resolved those conflicts, save and commit changes. In our example, the most common to have conflict is the .gitignore file. Just merge the content of the two conflicting files, save and commit it. However, it can automerge if the conflict does not occur on the same line.
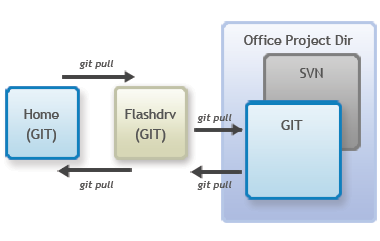
The diagram below shows the workflow of synchronizing your office repo and your home repo.
From the office, we pull the changes to the flash drive / thumb drive. Then at home, we pull the changes from the flash drive to our home repo. When we do changes at home, we commit it. When we go back to work, before leaving the house, we pull the changes from the home repo into the flash drive. Arriving at the office, we pull the changes from the flash drive into our office repo.
Pretty isn’t it?
